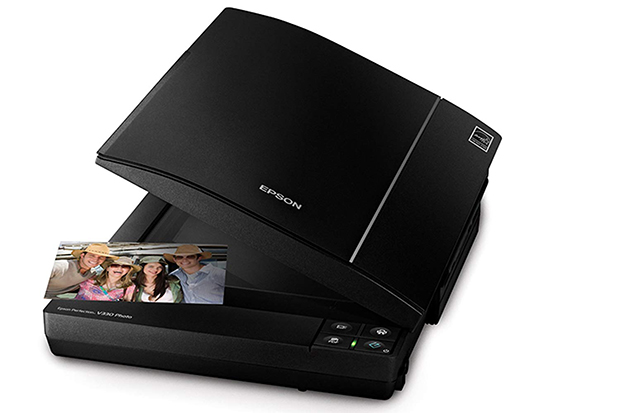
Note: The Epson V330 is a dated model that’s no longer sold by most retailers. However, it’s been replaced by the V370, which looks the same but with improved features. While this article covers information on the V330, it can likely be applied to the V370 as well. Links redirect to the V370.
I’ve been using the Epson Perfection V330 Photo scanner since 2012. It’s produced thousands of scans featured on the various arms of the site. I chose this model for its output quality, specifically for the way it scans holo-foil surfaces. The final presentation mimics the way that technology looks in-hand. I wanted the visual appeal to be as accurate online as it is in-person.
The Epson Perfection V330 Photo scanner is a very powerful machine as it comes with a variety of modes depending on your needs. I use the Professional Mode as it allows me to choose from a selection of options such as Document Type, Document Size, Resolution, Target Size, Adjustment settings, etc.
To purchase the Epson Perfection V330 (V370) Photo Scanner, click here.
For this exercise, I’ve compared the dpi outputs for 18 of the 20 dpi rates available on this machine. The two dpi rates I didn’t use were 9600 and 12800. I was unsuccessful in my attempts to scan at these rates because after 3200, the machine scans only a portion of the glass bed. Also, the time required to produce scans at these rates surpasses the 30-minute mark. For the 18 dpi rates I captured, here are the parameters I chose:
- Mode: Professional Mode
- Document Type: Reflective
- Document Source: Scanner Glass
- Auto Exposure Type: Photo
- Image Type: 24-bit Color
- Resolution: [Adjusted]
- Document Size: 8.50w x 11.70h in. at 100%
- Target Size: 8.50w x 11.70h in. At 3200 dpi, this setting was changed from inches to pixels and the selected area size was reduced.
- Adjustments: All disabled
For this experiment, I scanned the Darren Daulton 1993 Finest Refractor. I cropped each image to feature an area of the card that allows for a quick quality comparison. Notice the two print dimples on Darren’s helmet as well its surface quality, and how they appears clearer at each increased dpi rate. After 300 dpi, however, the differences are negligible. Scroll down to see all 18 full images.
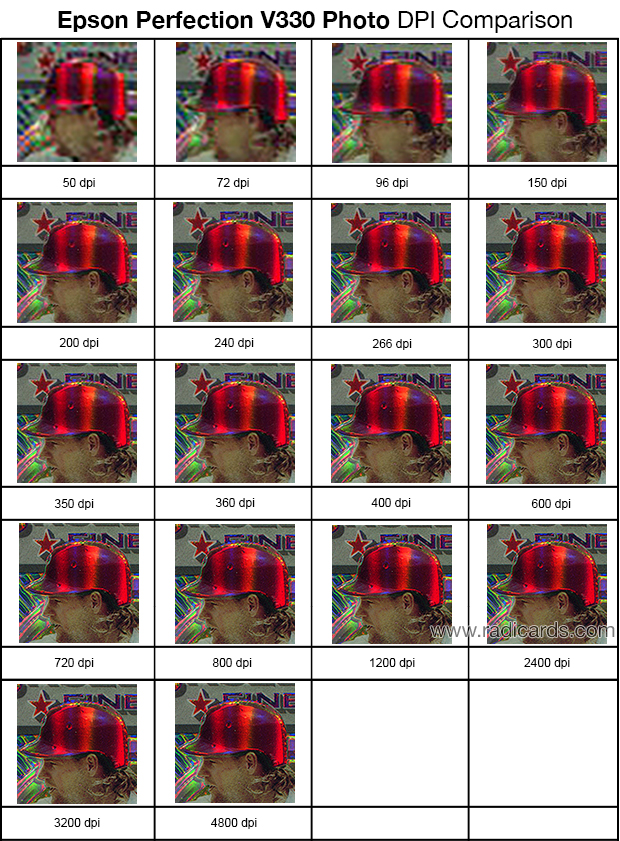
After all 18 scans were produced, I sized everything down to 400w that was above it, which was everything above 150dpi. I also ran all images through my standard upload-ready prep. process, which includes a variety of touch ups and a watermark. Here’s the run:

DPI: 50
Scan Time (min:sec): 0:09
Raw Output File Size: 24 KB
Uploaded File Size: 70 KB

DPI: 72
Scan Time (min:sec): 0:09
Raw Output File Size: 36 KB
Uploaded File Size: 104 KB

DPI: 96
Scan Time (min:sec): 0:09
Raw Output File Size: 56 KB
Uploaded File Size: 150 KB

If you want a quick and dirty scan, use 150 dpi. This rate is especially efficient for volume projects where timing is everything. I recommend this rate as a baseline.
DPI: 150
Scan Time (min:sec): 0:11
Raw Output File Size: 117 KB
Uploaded File Size: 275 KB

DPI: 200
Scan Time (min:sec): 0:11
Raw Output File Size: 221 KB
Uploaded File Size: 341 KB

DPI: 240
Scan Time (min:sec): 0:15
Raw Output File Size: 286 KB
Uploaded File Size: 347 KB

DPI: 266
Scan Time (min:sec): 0:15
Raw Output File Size: 363 KB
Uploaded File Size: 356 KB

300 dpi is generally considered the norm when it comes to scanning trading cards. The scan time is brief, file size is very reasonable, and image quality differences beyond this rate are trivial. If you’re new to scanning trading cards and need some guidance on what dpi setting to choose, go with 300 dpi; it’s pretty much the industry standard.
DPI: 300 (most common)
Scan Time (min:sec): 0:15
Raw Output File Size: 501 KB
Uploaded File Size: 366 KB

DPI: 350
Scan Time (min:sec): 0:24
Raw Output File Size: 580 KB
Uploaded File Size: 361 KB

DPI: 360
Scan Time (min:sec): 0:25
Raw Output File Size: 618 KB
Uploaded File Size: 361 KB

DPI: 400
Scan Time (min:sec): 0:25
Raw Output File Size: 790 KB
Uploaded File Size: 369 KB

600 dpi is my preferred rate. The difference is so negligible compared to 300 dpi that it doesn’t really matter but I like that subtle degree of extra detail. I also like having a slightly larger raw file to work with. The only draw back is that scanning at 600 dpi takes over twice as long as scanning at 300 dpi. Until this experiment, I never scanned anything above 600 dpi.
DPI: 600 (my preferred rate)
Scan Time (min:sec): 0:36
Raw Output File Size: 2.1 MB
Uploaded File Size: 392 KB

DPI: 720
Scan Time (min:sec): 1:40
Raw Output File Size: 2.6 MB
Uploaded File Size: 402 KB

DPI: 800
Scan Time (min:sec): 1:42
Raw Output File Size: 3.3 MB
Uploaded File Size: 405 KB

DPI: 1200
Scan Time (min:sec): 2.08
Raw Output File Size: 8.1 MB
Uploaded File Size: 413 KB

At 2400 dpi, the size of the raw output file jumps considerably from the last dpi rate of 8 MB to over 28 MB.
DPI: 2400
Scan Time (min:sec): 5.34
Raw Output File Size: 28.3 MB
Uploaded File Size: 414 KB

The 3200 dpi scan attempt initiated the following prompt: “Image size is too large. Reduce the Resolution or Scale setting, or decrease the size of the selected area to within 21000 x 30000.” Since this was an experiment, the only option I had was to reduce the size of the selected area.
DPI: 3200
Scan Time (min:sec): 16.04
Raw Output File Size: 23.1 MB
Uploaded File Size: 413 KB

Of the rates I was successful in processing, the 4800 dpi produces a scan of the highest quality but at over 14 minutes per scan, working at this rate is incredibly inefficient. Imperfections also appear highly defined at this rate. Notice how clear the dimples on the helmet look. Notice too that the raw file size is over 27 MB, which would add up in a hurry if storing raw files for projects with thousands of images. Even though scanning at this rate isn’t at all efficient, the scan quality is indeed a thing of beauty.
To give you an idea of dimension size of a file that’s 27.1 MB, the raw output file dimensions for 4800 dpi scan is 9360 x 12998, which is huge! However, large dimension files come with the benefit of having lots of space to work with when sizing files down for anything web. But we really don’t need that much space.
DPI: 4800
Scan Time (min:sec): 14.23
Raw Output File Size: 27.1 MB
Uploaded File Size: 411 KB
Conclusion:
The Epson Perfection V330 Photo scanner is an absolute work horse. I’ve processed many thousands of scans with this machine and it continues to perform as if it was brand new. I highly recommend this model.
Higher dpi rates aren’t always needed and they’ll always take up more processing time and storage space. Keep this in mind when selecting a dpi rate for your project. As stated previously, 300 dpi is ideal as it exists at the intersection of efficient process timing and acceptable quality. When considering a higher dpi rate than 300, be sure to identify why it would make sense to your project. It might not.
Key takeaway: Higher dpi rates, while fine tune overall image quality, come at the expense of your time and storage space. If you can get away with using a smaller dpi rate, which should be very easy to do, it’ll save you a lot of both of those valuable resources.
To purchase the Epson Perfection V330 (V370) Photo Scanner, click here.

 Have you visited our store? Click here.